Display Blogger Posts In Grid View With Thumbnails
Most of the bloggers customize their blogs and want to display their posts in grid view with thumbnail in their home screen but being newbie they find it difficult. Today in this brief tutorial I will show you a step-by-step process to display all posts in grid view with the thumbnail in the blogger home screen.
Basically, blogs which were image-based they have a lot of posts in their home screen, so when a visitor enters in the home screen they have to scroll down to go down for finding their photo (post). This gives a very bad user experience. So if you want to give your visitors a good user experience then you should convert your blogger home to display posts in grid view with thumbnails.
Hope that you liked the grid view with thumbnail script overview. If you want to have this grid style script in your blog then precisely follow all the steps.
Basically, blogs which were image-based they have a lot of posts in their home screen, so when a visitor enters in the home screen they have to scroll down to go down for finding their photo (post). This gives a very bad user experience. So if you want to give your visitors a good user experience then you should convert your blogger home to display posts in grid view with thumbnails.
What is a Grid View?
A grid view or a data grid is a graphical control element that presents a tabular view of data. A typical grid view also supports some or all of the following:- Clicking a column header to change the sort order of the grid
- Dragging column headers to change their size and their order
- In-place editing of viewed data
- Row and column separators, and alternating row background colours
What is Grid View In Blogger and how it works?
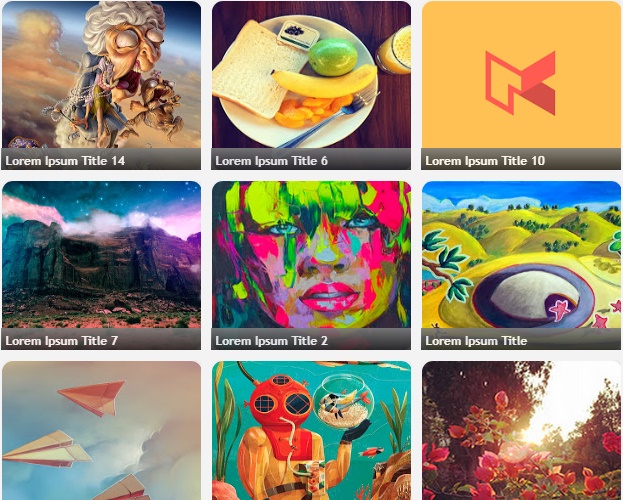
In Blogger, Grid View is a Script Code which converts blogger post to display in grid style in homepage. The script code overrides the existing codes in blogger template and force blogger posts to display in grid style with the thumbnail.
Before proceeding further, take a look at the grid view with thumbnail script demo look.
Hope that you liked the grid view with thumbnail script overview. If you want to have this grid style script in your blog then precisely follow all the steps.
How To Display Blogger Posts In Grid View With Thumbnails style
Follow the steps given below to display blogger posts in grid view with thumbnail style.
Step 1: Login to your blogger dashboard and select your blog.
Step 3: Click anywhere inside the blogger template and press [CTRL+F] a pop-up search box will open.
Step 4: Type </head> and hit enter.
Step 5: Above </head> paste the code
<script src='https://code.jquery.com/jquery-1.9.1.js'/>
<b:if cond='data:blog.pageType != "item"'><b:if cond='data:blog.pageType != "static_page"'>
<script type='text/javascript'>//<![CDATA[
function hideLightbox(){for(var a=document.getElementsByTagName("img"),b=0;b<a.length;++b)a[b].onmouseover=function(){var a=this.parentNode.innerHTML;this.parentNode.innerHTML=a,this.onmouseover=null}}$(document).ready(function(){var a=200,b=170,c="https://blogger.googleusercontent.com/img/b/R29vZ2xl/AVvXsEgkPeuNqUnw4xYroN6ihAA9ZxJ2CchoIDoY5P9x8S0wz1eyETrXUOHnj-Ivja7GM8437Tq4OERVarV2yIL2oO7nGiR_n_9iYD5jtpA3VHyogt_GYWZwL-thzO31BjMVWKtAlA14nY32ROM/w500-c-h330/no-thumb.png",d=1;$(".post-body").each(function(e,f){var f=$(f),g=$(f).find("img").first(),h=f.parent().find("h3 a"),i=h.attr("href"),j=h.text();if($(h).remove(),f.empty(),g.attr("src")){var k=g.attr("height"),l=g.attr("width"),m=$(g).parent();if(f.append(m),d)g.attr({src:g.attr("src").replace(/s\B\d{3,4}/,"w500-h330-c")}),g.removeAttr("width").removeAttr("height");else{g.attr({src:g.attr("src").replace(/s\B\d{3,4}/,"s"+a)}),g.removeAttr("width");var n=(k/l*a).toFixed(0);g.attr("height",n)}}else var g=$("<img>").attr("src",c),m=$("<a>").append(g).appendTo(f);m.attr("href",i).css("clear","none").css("margin-left","0").css("margin-right","0").addClass("postThumbnail");var o=$("<div>").prepend(j).css("opacity","0.9").css("filter","alpha(opacity=0.9)").appendTo(m);o.height();o.css("margin-top","-28px"),f.css("height",b).css("overflow","hidden")}),$("#blog-pager").css("clear","both")}),window.addEventListener?window.addEventListener("load",hideLightbox,void 0):window.attachEvent("onload",hideLightbox);
//]]>
</script>
<style type='text/css'>
.post {
width:31.3%;
float:left;
display:inline-block;
border-bottom: medium none;
margin: 0 1% 2%;
padding-bottom: 0;
}
h2.date-header,.post-footer {
display: none;
}
h3.post-title, .comments h4,.post-header{margin:0;}
.postThumbnail:hover {text-decoration:none;}
a.postThumbnail div {
text-decoration: none;
color: #fff;
padding:0 5px;
height:24px;
font:bold 12px/25px "Trebuchet MS",Trebuchet,Verdana,sans-serif;
text-transform: capitalize;
background: rgb(125,126,125);
background: -moz-linear-gradient(top, rgba(125,126,125,1) 0%, rgba(14,14,14,1) 100%);
background: -webkit-gradient(linear, left top, left bottom, color-stop(0%,rgba(125,126,125,1)), color-stop(100%,rgba(14,14,14,1)));
background: -webkit-linear-gradient(top, rgba(125,126,125,1) 0%,rgba(14,14,14,1) 100%);
background: -o-linear-gradient(top, rgba(125,126,125,1) 0%,rgba(14,14,14,1) 100%);
background: -ms-linear-gradient(top, rgba(125,126,125,1) 0%,rgba(14,14,14,1) 100%);
background: linear-gradient(to bottom, rgba(125,126,125,1) 0%,rgba(14,14,14,1) 100%);
filter:progid:DXImageTransform.Microsoft.gradient(startColorstr='#7d7e7d',endColorstr='#0e0e0e',GradientType=0 );
}
.postThumbnail{width:100%;}
.postThumbnail:hover div {
display: block;
}
.postThumbnail img {
width:100%;
background-color: transparent;
border: medium none;
padding: 0px;
-webkit-border-radius: 12px;
-moz-border-radius: 12px;
border-radius: 12px;
transition: opacity .25s ease-in-out;
-moz-transition: opacity .25s ease-in-out;
-webkit-transition: opacity .25s ease-in-out;
}
.postThumbnail img:hover {
-ms-filter: "progid: DXImageTransform.Microsoft.Alpha(Opacity=70)";
filter: alpha(opacity=70);
-moz-opacity: 0.7;
-khtml-opacity: 0.7;
opacity: 0.7;
}
</style>
</b:if></b:if>
Step 6: Click "Save Template". Enjoy(y) you are done!
How To Customize Blogger Posts In Grid View Script?
Step 1: To Change the width of the thumbnail replaces 200 with your desired size.
Step 2: To Change the width of the thumbnail replaces 170 with your desired size.
Step 3: To Change default no image icon replace the thumbnail replace
https://blogger.googleusercontent.com/img/b/R29vZ2xl/AVvXsEgkPeuNqUnw4xYroN6ihAA9ZxJ2CchoIDoY5P9x8S0wz1eyETrXUOHnj-Ivja7GM8437Tq4OERVarV2yIL2oO7nGiR_n_9iYD5jtpA3VHyogt_GYWZwL-thzO31BjMVWKtAlA14nY32ROM/w500-c-h330/no-thumb.png
with your desired image icon.
Over to you
Now visitors of your blog will see your all posts in cool grid style with the thumbnail. If you have any further query relating implementation of Blogger Posts In Grid View With Thumbnails script code comment down we are ready to help you. If you are benefitted by this tutorial Share and let others know. Comment down let me know how this grid style script transformed your blogger appearance.


